Introduction
If you have ever worked on Excel reports, MIS dashboards, or data entry sheets, you already know how messy data can become when people type values manually. Learning how to create a drop-down list in Excel is one of the most valuable skills for anyone working with spreadsheets.
Small spelling mistakes, inconsistent entries, or duplicate variations can completely break your analysis.
This is where an Excel drop-down list becomes extremely useful. It allows you to standardize inputs and avoid confusion caused by manual typing.
A drop-down list allows users to select predefined values instead of typing manually. This not only saves time but also ensures accuracy and consistency in your data.
In professional environments, even small errors can lead to wrong business decisions, so this feature becomes very important.
In this complete guide, you will learn how to create a drop-down list in Excel, along with advanced techniques like dynamic lists, dependent drop-downs, and real-world use cases used by MIS executives and data analysts.
What is a Drop-Down List in Excel?
A drop-down list in Excel is a feature that allows users to choose a value from a predefined list. Instead of typing, you simply select from available options, which makes the process faster and more reliable.
This is why a drop-down list in Excel is widely used in MIS reporting.
For example:
- Department: Sales, HR, Finance
- Status: Pending, Completed, Cancelled
- Product Category: Electronics, Clothing, Grocery
This feature is widely used in MIS reports, dashboards, and structured data systems where consistency is required. It also improves the overall look of your Excel sheet, making it more professional and easier to understand.
Another key advantage is that it reduces dependency on user input accuracy. Even beginners can use the sheet correctly without making mistakes.
Basic Method to Create a Drop-Down List in Excel
Let’s start with the simplest method to create a drop-down list. This method is ideal for beginners who are just starting with Excel and want quick results.
Step-by-Step Process:
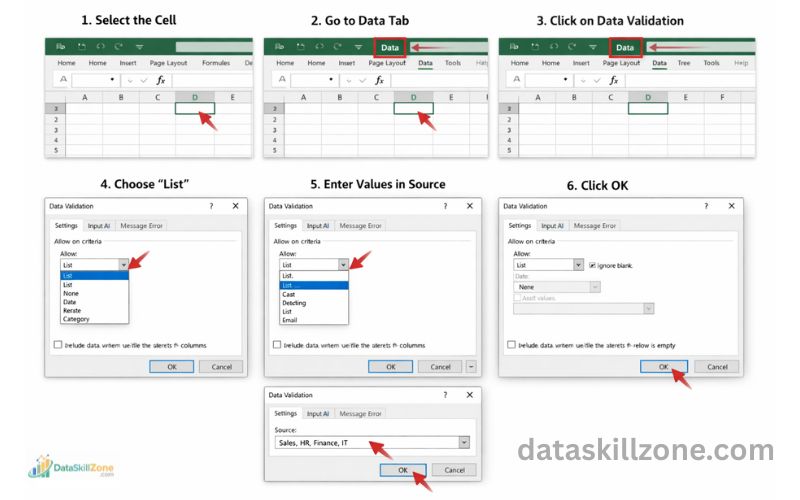
- Select the cell where you want the drop-down
- Go to the Data tab
- Click on Data Validation
- In the “Allow” section, select List
- In the “Source” box, enter values like:
Sales, HR, Finance, IT - Click OK
Now your drop-down list is ready. You can click on the cell and select values from the list instead of typing manually.
This method is quick and easy but has a limitation.
If your list grows in the future, you will need to update it manually, which can become time-consuming.
Creating Drop-Down List Using Data Validation (Detailed Understanding)
The core feature behind drop-down lists in Excel is Data Validation.
- It is one of the most powerful tools available in Excel for controlling how data is entered into a worksheet.
- Data Validation allows you to restrict input values, which helps in maintaining clean and structured data.
- It ensures that users can only enter specific values, preventing unwanted or incorrect entries.
Imagine a situation where multiple users are entering data into the same file. Without validation, each person might use different formats, leading to confusion during analysis.
With a drop-down list created using Data Validation, all users are forced to select from the same options.
This ensures uniformity and makes data processing much easier and faster.
Excel uses a feature called Data Validation to control what users can enter into a cell. According to the official Microsoft guide on applying Data Validation in Excel, this feature can restrict input, create drop-down lists, and prevent incorrect data entries in spreadsheets.
Creating a Drop-Down List from a Range of Cells
Instead of typing values manually, you can create a drop-down list from a range of cells. This method is more flexible and commonly used in real-world projects.
📌Steps:
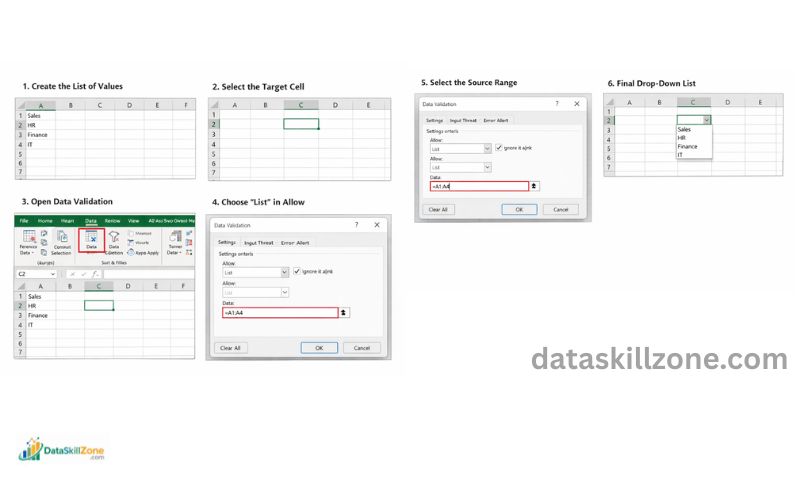
- Enter your list in a column (e.g., A1:A5)
- Select your target cell
- Go to Data → Data Validation
- Choose List
- In Source, select the range (A1:A5)
- Click OK
Now your drop-down is linked to that range of cells. Any changes made in the source list will reflect in the drop-down.
This approach is very useful when working with large datasets. It also makes your Excel sheet easier to maintain, as you don’t need to edit the drop-down settings again and again.
Dynamic Drop-Down List in Excel (Advanced Technique)
A dynamic drop-down list is designed to update automatically whenever new data is added. This is especially useful in professional environments where data changes frequently.
For example, if you are managing a product list and new items are added regularly, a dynamic drop-down will automatically include those new entries without requiring manual updates.
📌 Steps to Create Dynamic Drop-Down:
- Enter your data in a column
- Select the data range
- Press Ctrl + T to convert it into a Table
- Go to Data Validation
- Select List
- Use the table range as the source
Now, whenever you add new rows to the table, the drop-down list will expand automatically. This saves time and reduces manual work.
Dynamic drop-downs are widely used by data analysts and MIS professionals because they make reports scalable and future-proof.
One of the easiest ways to create a dynamic drop-down list is by converting your dataset into an Excel table. Microsoft explains how structured tables automatically expand when new rows are added in their official Excel tables overview and structured data guide.
Static vs Dynamic Drop-down List
| Feature | Static List | Dynamic List |
|---|---|---|
| Updates automatically | ❌ No | ✅ Yes |
| Maintenance | High | Low |
| Best for | Small data | Large datasets |
Dependent Drop-Down List (Advanced & Powerful)
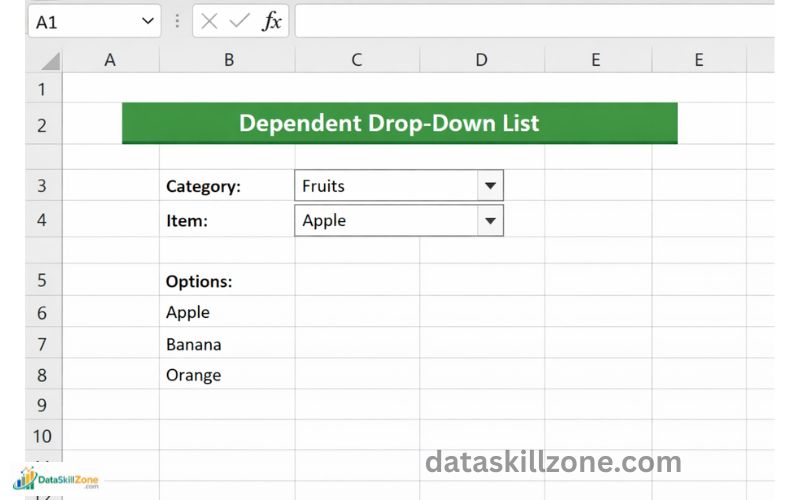
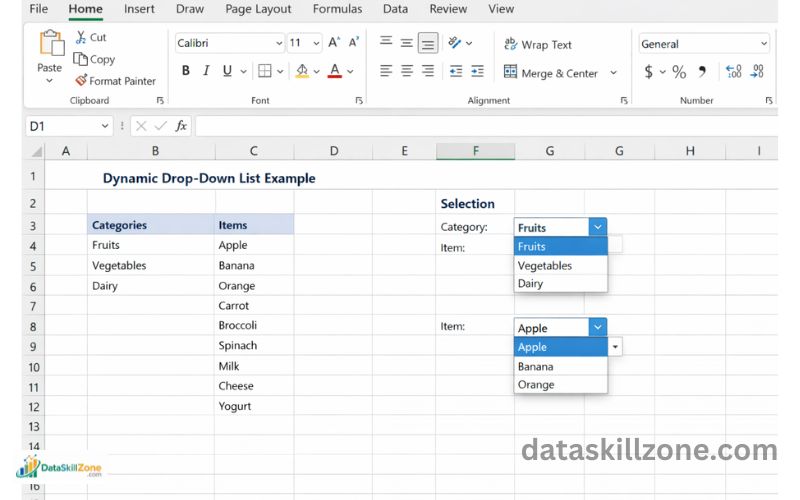
Dependent drop-down lists are one of the most advanced and useful features in Excel. They allow you to create a relationship between two or more drop-down lists.
For example, when you select a country, the second drop-down shows only states related to that country. This improves user experience and makes data selection more intuitive.
📌 Example Structure:
- First Drop-Down: Country
- Second Drop-Down: State
This feature is commonly used in:
- Forms
- Dashboards
- Reporting systems
where multiple levels of data selection are required.
⚙️ How It Works:
- Create separate lists for each category
- Define Named Ranges
- Use the INDIRECT function in Data Validation
While it may seem complex at first, once you understand the logic, it becomes very powerful.
Using dependent drop-downs can make your Excel files look highly professional and interactive.
Creating Drop-Down List from Another Sheet
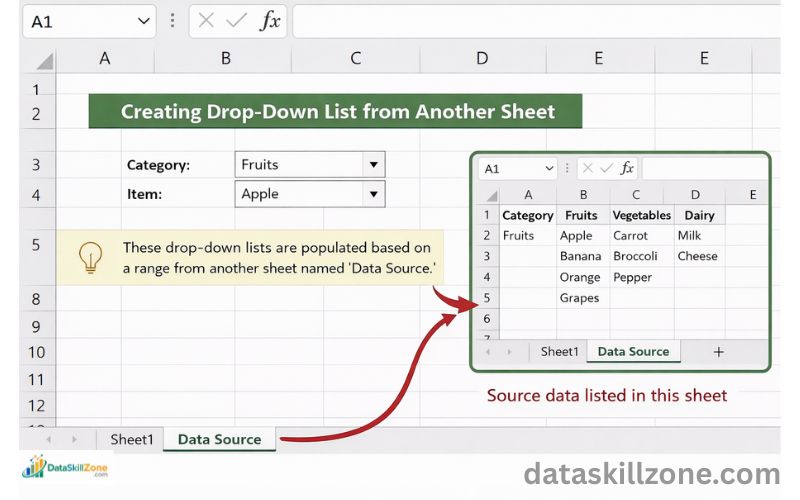
In many real-world scenarios, your data is stored in a separate sheet to keep things organized.
Excel allows you to create drop-down lists using data from another sheet.
This method helps in maintaining a clean and structured workbook.
Your main working sheet remains simple, while all the data is stored in a separate location.
To do this, you need to create a named range for your list and then use that name in Data Validation. This ensures that Excel can reference the data correctly.
📌 Steps to Follow:
- Go to the sheet where your data is stored
- Select your list
- Create a Named Range (Formulas → Define Name)
- Go back to your main sheet
- Open Data Validation
- Enter the named range in the Source field
This approach is especially useful for large projects where multiple lists are used across different sheets.
How to Edit or Remove a Drop-Down List in Excel
After creating a drop-down list in Excel, you might sometimes need to update it. For example, a new department may be added to your organization, a product category might change, or an option may no longer be required. In such situations, knowing how to edit or remove a drop-down list becomes very useful.
The good thing is that Excel allows you to easily modify an existing drop-down list without creating it again from scratch. You simply need to access the Data Validation settings and update the source values.
✏️ Steps to Edit a Drop-Down List
- Select the cell that contains the drop-down list
- Go to the Data tab in the Excel ribbon
- Click on Data Validation
- In the Source field, edit the list values
- Add new options or remove unwanted ones
- Click OK to save the changes
Once you update the source, the drop-down list will immediately reflect the new values.
🗑️ Steps to Remove a Drop-Down List
Sometimes you may want to remove the drop-down list completely while keeping the data already entered in the cell.
- Select the cell containing the drop-down
- Go to Data → Data Validation
- Click Clear All in the settings window
- Press OK
After doing this, the drop-down arrow will disappear, and the cell will behave like a normal Excel cell.
Learning how to manage and update a drop-down list in Excel helps keep your spreadsheets organized and flexible, especially when working with reports that change frequently in real-world business environments. 📊
Common Errors and Fixes
While creating drop-down lists, beginners often face small issues that can be frustrating. Understanding these common errors can save you a lot of time.
- One common issue is that the drop-down list does not appear.
- This usually happens when Data Validation is not applied correctly.
- Recheck Data Validation settings
- Ensure “In-cell dropdown” is enabled
- Another issue is blank values appearing in the list.
- This can be fixed by removing empty cells from the source range.
- Sometimes, the list does not update when new data is added.
- In such cases, using a dynamic drop-down method is the best solution.
- Error while selecting range
- Check formatting and remove invalid characters
By learning these fixes, you can handle problems quickly and work more efficiently.
Tips to Use Drop-Down Lists Like a Pro
If you want to work like a professional MIS executive, you need to go beyond basic usage. Small improvements in how you use drop-downs can make a big difference.
👉 Always use drop-down lists for fields where repeated values are entered. This ensures consistency and reduces manual effort.
👉 Keep your source data clean and well-organized.
👉 Avoid unnecessary spaces or duplicates, as they can affect your drop-down.
👉 You can also combine drop-down lists with conditional formatting to create visually appealing dashboards. This enhances both usability and presentation.
Practicing these tips will help you build more efficient and professional Excel reports.
Real-Life Use Cases of Drop-Down Lists
Drop-down lists are not just a basic feature – they are used in almost every professional Excel file. Understanding real-life applications will help you use them more effectively.
- In MIS reports, drop-downs are used for selecting departments, regions, or report types. This makes reporting more structured.
- In sales dashboards, they are used to filter data based on product categories or locations. This allows quick analysis without changing the dataset.
- In attendance sheets, drop-downs help standardize entries like Present, Absent, or Leave. This ensures accurate tracking.
These practical use cases show how important drop-down lists are in daily work.
In many companies, professionals who can create clean Excel reports and automated dashboards are often recognized for their efficiency.
Developing strong spreadsheet skills can even contribute to faster career growth, something I personally discussed in my article Skills That Helped Me Get Promoted Faster – My Honest Work-Life Story.
Advanced Excel Drop-Down Techniques for MIS Reports
If you want to stand out in your job role, you should learn advanced techniques using drop-down lists.
🚀 Advanced Techniques:
- Use drop-down lists with Conditional Formatting
- Highlight data based on selection
- Highlight data based on selection
- Use drop-downs as Dashboard Filters
- Create interactive reports
- Create interactive reports
- Combine with formulas:
- VLOOKUP
- INDEX-MATCH
- XLOOKUP
- VLOOKUP
- Use drop-downs in automated MIS reports
- Reduce manual work
- Reduce manual work
💡 Why This Matters:
- Makes your reports interactive
- Improves efficiency
- Helps in better decision-making
📊 Real Work Example:
- Monthly sales MIS dashboard
- Performance tracking sheet
- Automated reporting system
Drop-down lists are commonly used while building structured MIS dashboards because they allow users to filter and organize large datasets easily. If you want to understand how these features are applied in real reporting environments, you can also explore our detailed guide on 7 Steps to Design MIS Reports for Sales, HR, and Finance Teams in Excel – Complete Guide.
Advantages of Using Drop-Down Lists in Excel
There are several benefits of using drop-down lists in Excel, especially in professional environments.
- They reduce data entry errors by limiting user input to predefined options.
- Using a drop-down list in Excel improves data accuracy significantly.
- They also save time, as users do not need to type values repeatedly. This increases productivity, especially in large datasets.
- Another advantage is that they improve the overall structure and readability of your Excel sheet. Clean data leads to better analysis and decision-making.
Overall, drop-down lists are a simple feature with a powerful impact.
My Final POV
Creating a drop-down list in Excel is one of the simplest yet most powerful features that can completely transform the way you handle data.
It helps in :
- Improving accuracy
- Saving time
- Building professional reports
Whether you are a beginner or an experienced professional, mastering this feature is essential.
Start with basic drop-down lists and gradually move towards advanced techniques like dynamic and dependent lists.
With practice, you will be able to create efficient and interactive Excel dashboards.
If you regularly work with spreadsheets, learning advanced Excel dropdown techniques can significantly improve your productivity.
FAQs
1. How do I add multiple selections in an Excel drop-down list?
By default, Excel drop-down lists allow only one selection per cell. However, you can enable multiple selections by using VBA (Visual Basic for Applications). With a simple VBA script, users can select multiple values from the same drop-down list, which will appear separated by commas inside the cell. This technique is often used in survey forms, task trackers, and project management sheets.
2. How do I copy a drop-down list to other cells in Excel?
You can easily copy a drop-down list to multiple cells using copy and paste.
📌 Steps:
- Select the cell that already contains the drop-down list
- Press Ctrl + C to copy
- Select the cells where you want the same drop-down
- Press Ctrl + V
The Data Validation settings will also be copied along with the drop-down list.
3. Can I create a searchable drop-down list in Excel?
Yes, it is possible to create a searchable drop-down list in Excel, but it usually requires advanced techniques such as formulas, Excel 365 features, or VBA. Searchable drop-down lists allow users to type a keyword and filter matching options from the list. This feature is especially useful when working with very large datasets.
4. What is the maximum number of items allowed in an Excel drop-down list?
Excel allows up to 32,767 items in a drop-down list when the source is a range of cells. However, if you manually type values directly into the Data Validation source box, the total character limit is 255 characters. For larger lists, it is always better to reference a cell range instead of typing values manually.
5. How do I prevent users from entering values outside the drop-down list?
Excel’s Data Validation error alert can prevent users from entering values that are not part of the drop-down list.
📌 To enable this:
- Go to Data → Data Validation
- Open the Error Alert tab
- Choose Stop as the error style
This will restrict users from typing any value that is not included in the drop-down options.
6. Why is the drop-down arrow not visible in my Excel cell?
Sometimes the drop-down arrow may not appear even though Data Validation is applied. This can happen if the “In-cell dropdown” option is disabled in the Data Validation settings. Another reason could be that the cell is too narrow to display the arrow. Adjusting the column width or enabling the dropdown option usually fixes the issue.